As an amateur starting your first blog or a businessman running an expanding online business, WordPress will provide you with a powerful platform on which to create and sustain a successful website.
However, to get the most out of it, you should do more than the basics.
In this article, we will show you around 20 easy WordPress tricks and tips that you can use to improve the performance of your WordPress installation to make it load faster, increase its security, make your work process more efficient, and enhance the user experience of your visitors.
Here is your to-do list to manage a more efficient and more resistant WordPress site, starting with creating a testing environment and ending with working with WP-CLI to find an easy way to perform faster maintenance.
The Best WordPress Tips and Tricks to Manage Your Website
Now, we would be better off discussing the 20 best WordPress methods that you can deploy to keep your website secure, high-performance, and user-friendly.
1. Choose the Right Hosting Platform
One of the most crucial decisions you can make as far as your websites are concerned is choosing the proper hosting platform.
What you choose in terms of hosting service influences all those, including speed and uptime, security, and scalability. Precisely, this may involve the convenience of your users and the convenience of the growth of your company, and the list goes on.
The following are some of the major factors to put into consideration when selecting hosting options:
-
- Stable Uptime– A decent host must be able to assure high stability levels (preferably on a bare minimum of 99.9 percent) so that your site can function at an all-time high.
-
- High Performance – The best providers serve the quick loading of pages utilizing optimized servers and caching technology.
-
- Scalability– Check the hosts that can easily scale up the resources, without creating a need to change over.
-
- Strong Security– A good hosting provider must provide some kind of built-in security, such as firewalls, virus protection, DDoS protection, and free and automatically-renewed SSL certificates.
The WordPress plans by Hostinger are a combination of speed, good prices, and ease of use, which includes:
-
- Dependability with a 99.9 percent uptime guarantee to assure that your website is always on the net.
-
- Low universal load times, with the initial response times on average being 143 ms, and after loading pages, ~1.56 seconds.
-
- Good security provisions like free SSL, malware scanning, and daily/weekly backup. Live chat and email support 24/7, and a knowledge base.
-
- The types of available hosting that are scalable are managed WordPress, cloud, and VPS hosting.
2. Clean Up Your Database Regularly
The data about your posts, pages, user information, settings of your plugins, etc., is all saved in your WordPress database.
With time, it may build up trash such as draft revisions, spam comments, as well as year-old entries by plugins that one has removed, thus slowing down your site.
MySQL queries to retrieve the content and deliver this to the users execute more slowly when the database is filled with surplus information.
It causes slow loading speed, slow Time to First Byte (TTFB), and a poor experience for visitors.
It will keep your database clean, which will speed up the data fetching to WordPress, response time, and even put less load on the server.
Cleaning your WordPress database can be done in two basic ways simple and friendly method by installing and using optimization plugins to get it done, and a manual method by manually optimizing it using phpMyAdmin, which gives you more direct control.
Optimizing the Database with Add-ins
You may install one of the following WordPress database plugins to access the intended output without sifting through lines of code or even directly manipulating database files:
-
- WP Rocket – Gives scheduled or one-click clean-ups to remove post revisions, spam comments, and so on.
-
- WP-Optimize- Converts database cleanup into image compressing and page caching.
-
- Advanced Database Cleaner – Perfectly usable in the case of cleaning orphaned tables, other remnants of erased plugins.
-
- WP-Sweep- It focuses on cleaning up unused and duplicate entries. Optimizing the database with the help of optimization plug-ins.
Optimizing the Database Manually (with phpMyAdmin, more advanced users should have a look)
In case you feel at ease working with database tools, you can manually optimize it:
- Access your hosting control panel and then open phpMyAdmin.
- Choose your WordPress DB. Select all the tables and go to Optimize Table and select it.
- This returns used space, simplifies table designs, and improves query performance.
When you are using Hostinger as your hosting service, hPanel includes very detailed instructions on how you can optimize a database, so to get the full information on database optimization with WordPress, you can read our in-depth article about WordPress database optimization. Employing database optimisation plug-ins.
Important!
Make a complete backup of your site and database before performing any important change, automatic or manual.
3. Back Up Your Site Regularly
Your WordPress web page in WordPress can become a victim of hackers, plugin incompatibility, server crashes, accidental deletions, or update issues.
Doing frequent backups provides you with a reserve into which your data and files can be contained in case of a security breach or any other major issue.
There are two broad methods of backing up your WordPress site:
Using a Plugin
Plugins provide an easy means of scheduling backups and automating them without going straight to your server files and database.
Popular to choose:
-
- UpdraftPlus– It supports full-site backup and is simple to restore.
-
- Jetpack– Jetpack will allow real-time backups and restores in one click (paid).
Performing Manual Backups
In case you feel familiar with using your hosting dashboard or FTP, you can create a manual backup using the following two steps:
- Dumping your database on your computer with phpMyAdmin.
- Download your entire site files (themes, plugins, uploads) over FTP or File Manager in your control panel to your computer.
This technique is more fine-grained yet takes care and a bit of technical expertise.
You want greater detail? Consider our full WordPress backup tutorial.
When using Hostinger, you do not have to worry about backing up your site often since this company offers automatic daily or weekly backups according to the plan you have created.
These backups are made safe and can be restored within a few clicks, making you calm and saving you a lot of time.
4. Password-Protect the WP-Admin Directory
The epicenter of your WordPress site is your wp-admin directory, which contains all the important files and tools required to manage your content, plugins, and themes.
In case a hacker gets control over it, he or she may steal confidential information, destroy your site, or lock it down totally.
It is for this reason that adding a layer of security to this directory is a prudent decision that will keep WordPress safe.
This is how to manually password-encrypt your wp-admin directory:
Warning! Editing of essential files such as .htaccess and .htpasswd might be dangerous. An incorrect setup can result in fatal errors at the site or can lead to an outage. This approach is advised specifically for the advanced users, who are not afraid to work with the server files.
These backups are safe, but you can restore them in a couple of clicks and have certainty that nothing can hurt your databases.
1. Create a new username and password that is intricate by using a tool like HTPasswd Generator.
2. Copy the result of encryption that appears in the form of a long series of random characters, which begins with your desired username.
3. Log into your web server by either using FTP or your provider’s file manager.
4. Go to your hosting account home directory (this is generally in a directory above the public_html).
5. Make a new file .htpasswd and copy the encrypted line into this file and save it.
6. Enter into the folder public_html/wp-admin/. In case no .htaccess file is there, create a new one.
7. In the several access files, copy the code below and put it inside the .htaccess file:
AuthName "Admin Area"

AuthType Basic

AuthUserFile /home/yourusername/.htpasswd

Require valid-user
8. The /home/yourusername/.htpasswd file should be changed to the real path where your htpasswd file is located.
9. In case you do not know what the real path is, just edit the path.php file and put the following information into a temporary PHP file saved in your public_html folder:
<?php echo getcwd(); ?>
10. The proper path can be viewed by visiting the file in your browser.
11. To prevent the breaking off of the features such as WordPress Customizer, insert the following line of code at the end of the aforementioned line of code in the same .htaccess file:
<Files admin-ajax.php>

    Order allow,deny

    Allow from all

    Satisfy any

</Files>
12. Save it. Test it by creating an incognito/private window and sending yourdomain.com/wp-admin.
13. Now, instead of the usual WordPress login screen, you should notice a pop-up that requests the creation of a new username and password.
Although this is a sure way, most hosting companies provide directory password protection through their control panel, too.
The procedure and the terms could be different depending on your host, but the result is identical.
In case you use Hostinger, you may follow the step-by-step guide in our How to password-protect a site article.
5. Use a Staging Environment to Test Changes
Stagnating environments are ideal to test big updates, experiment with new plugins, or even a redesign of your whole site.
They are your real-time site in a mirror so that you are able to recognize precisely how advancements will act without having to push live.
Depending on the plan you have at Hostinger, a staging environment can be created with just a couple of clicks on your control panel.
It has an in-built staging tool, which enables you to make a copy of your site, experiment with the changes, and update them.
However, when your hosting provider does not support this feature, then you are not left helpless, as you can do some of the following:
-
- By installing a staging WordPress plugin, such as WP Staging or Duplicator. Using these tools, you may have a copy of your site on the same hosting environment where you can experiment and test changes with the safety of knowing that you at least have the original with you.
-
- Establishing a manual staging environment by several subdomains (e.g., staging.yoursite.com), copying a current copy of WordPress on it, and pasting the file and database of your live site. This technique takes a little greater technical expertise.
See our WordPress staging environments tutorial to learn all the tricks and get a full install guide.
6. Use a Child theme to Implement Changes to Theme Files
A child theme is a WordPress theme of its own, which incorporates the design and features of a pre-existing theme, the parent theme.
It is an ingenious way when you need to make some modifications to some of the theme files without the fear that your modifications will be lost should there be an update on the parent theme.
To create a child theme, go through the following steps:
- Name the folder that will be in wp-content/themes/ with your parent theme name and add -child to it at the end.
- Insert a style.css file in the child theme folder. Such a file has to contain a header, which informs WordPress which parent theme should be used.
- Include optionally, but strongly recommended, option functions.php to align the styles of the parent theme and include custom PHP where required.
- You can activate your child theme in the dashboard of WordPress in Appearance > Themes.
To view more in-depth steps with examples of code and guidelines, check our walkthrough on creating a WordPress child theme.
7. Learn WP-CLI
WP-CLI (WordPress Command Line Interface) is a very efficient instrument that allows you to take control of your WordPress site with text-based commands rather than the dashboard.
These commands have the capability of upgrading plugins/plugins to do database activities in a few seconds, and do automatic regular cleaning of the websites.
These are some useful WP-CLI commands:
- WP plugin update wp plugin update The command line.
- WP core update: Command updates WordPress.
- With the plugin list WP, you can view all the installed plugins.
- There is a command, create user, to make new users with a particular role and a randomly generated password:
Hostinger will provide WP-CLI as a standard on its Premium and higher-level web hosting packages and all managed WordPress hosting packages as well.
Supposing you do not access WP-CLI via your hosting provider, you can follow some steps to install it, which are reported in our How to use WP-CLI tutorial.
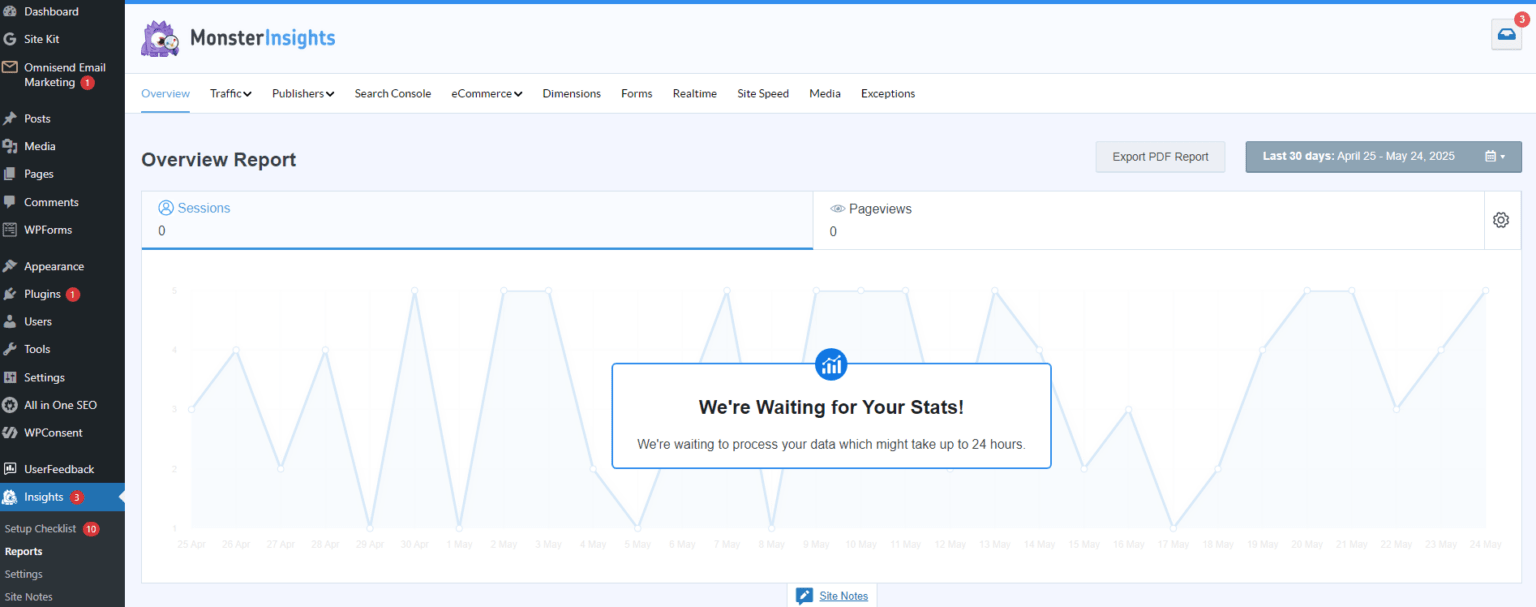
8. Monitor Website Analytics
The actual story about your traffic is told by analytics. Following the proper analytics will enable you to:
-
- Find out the pages with the highest visits.
-
- Know the source of your traffic (search, social, direct, etc.).
-
- Check out which content is holding visitors and which ones are causing bounces.
-
- Measure the ROI of your marketing activities and track the conversions.
Check the following metrics:
-
- Traffic sources show you where your visitors come from (Google, social media, email, referrals).
-
- Bounce rate- It informs you of the percentage of visitors who bounce after they have seen a single page.
-
- Day/long average – Session duration – Provides an idea of how long users spend on your site and read or view your content.
-
- Pageviews per session- Indicates the number of pages that a user views at a time.
-
- Conversion rate -displays the percentage of visitors that take an intended action, such as subscribing to a newsletter or purchasing.
These insights can be tracked by installing Google Analytics on your WordPress site.
Here’s how:
- Go to analytics.google.com and follow the steps to create an account of Google Analytics account and establish a property for the site.
- To do the integration without coding, install a plugin such as MonsterInsights.
- Log in to the plugin with your account and pick the correct property.
- Start tracking! Your dashboard will start gathering data pretty soon, and it can take 24-48 hours to display complete reports.
To add Google Analytics, with as minimal effort as possible, the plugin will be the easiest solution, but in case you wish to skip an additional performance overhead and/or see other alternatives, see our how to add Google Analytics to WordPress without using a plugin.
9. Split Long Posts into Pages
Longer posts with details are good and the SEO, of course, but then their scrolling is enough to feel that your readers are getting overwhelmed.
That is where post pagination comes in. It is a technique of separating the content into several pages as opposed to showing all the information on one page.
It contributes to the enhanced readability, optimization of the loading time, and even increases the page views.
There is no need to install a plugin and have any technical expertise to paginate a post in WordPress.
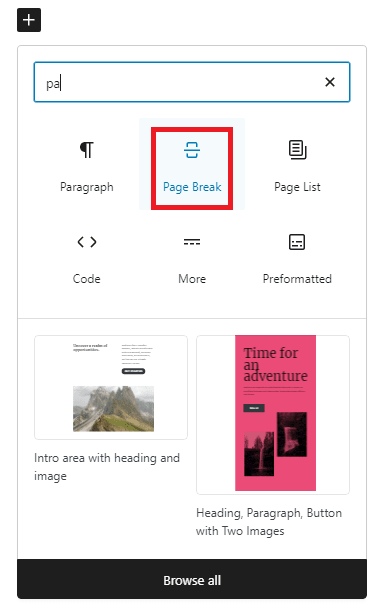
Just change the WordPress editor to the Text or Code view and add the <!–nextpage–> tag where you wish the content to break onto the next page.
After you edit or publish that post, WordPress automatically divides it at this point and adds the page navigation links (below).
There is also an option to introduce a Page Break block in case you use the Gutenberg (block) editor, as well as to set it where you want the break to take place.
Pro Tip
Using pagination can apply to tutorials, thorough guides, a post that may reach 2000 words, or any piece of writing that can be divided into several parts logically.
10. Display Post Excerpts
Rather than displaying complete blog posts on your homepage or on your archive pages, deciding to display summaries of your content will be a better idea. They are referred to as post excerpts.
It is through excerpts that your visitors will be able to read the summaries of the posts in a list of articles, to see all the information about something that can provide more information than they will get when reading the titles. It is also a more efficient way of going through articles as compared to scrolling through full articles.
Not only will that make the experience easier for the user, but it will also speed up the blog page load time since including images, embeds, and other bits of heavy content in your posts will no longer have the adverse effect it does on the page loading time.
Besides that, quicker loading might assist you in enhancing your Core Web Vitals, which in turn can also influence your payments on search engines.
WordPress themes have most of them that are excerpt compatible, and some might show the full content by default.
In order to alter this one, you will go to your WordPress dashboard and edit a post, and in the post editor, you will find the Add an excerpt option.
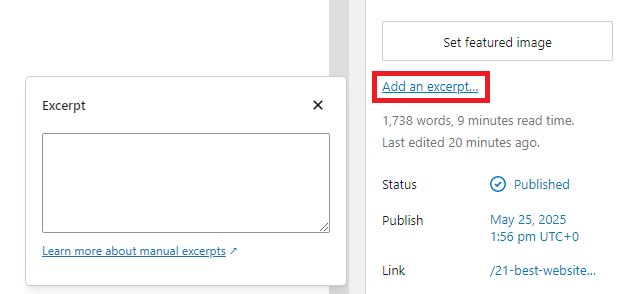
Put a short summary in the Excerpt box, and post an update.
On some themes, there exists a toggle under Customize Blog, and blog archives show an excerpt.
When your theme doesn’t support excerpts or you would just like to be in control of how excerpts are displayed, you can use an excerpt plugin such as the Advanced Excerpt or Simply Excerpts.
Pro Tip
Write excerpts in the form of mini hooks, make them short (30-40 words), emphasize the key idea of the post, and add the right amount of intrigue so that the readers will be eager to go to Read More.
11. Utilize the Quick Edit Feature
Quick Edit is an automatic functionality that enables you to do rapid edits of important posts or page settings in your WordPress panel without opening any of them separately.
You can edit with Quick Edit:
-
- Slug (URL) and the title
-
- The date of publication and time of publication
-
- Author
-
- Password-Protection and privacy status
-
- Status (Published, Draft, Pending Review)
-
- Pingbacks and comments (on/off)
-
- Tags and categories
-
- Sticky status (Should the post be kept at the top)
-
- Parent page (hier Andy hierarchy page)
Using Quick Edits only requires a couple of steps:
- Log in to the WordPress Dashboard, and go to Posts or Pages.
- Place the cursor over the item where updating is to be done, and then click on the Quick edit link.
- Clicking on an inline editor will open it, where you can see all fields to edit, as title, slug, date, author, categories, and others.
- Write your differences and hit the Update button to save them immediately.

12. Use SEO-Friendly Permalinks and URLs
The complete web address of a page or post on your site is called a permalink (short form: permanent link) and can be used by other sites to allow a direct link to a specific location within your site, instead of referring people to your home page.
An uncluttered, well-written permalink may help increase user trust, click-through rates, and credibility of the site as a whole.
It will also assist your visitors and search engines to know what the page is all about.
To install SEO friendly permalinks in WordPress, open the WordPress dashboard and go to Settings, Permalinks.
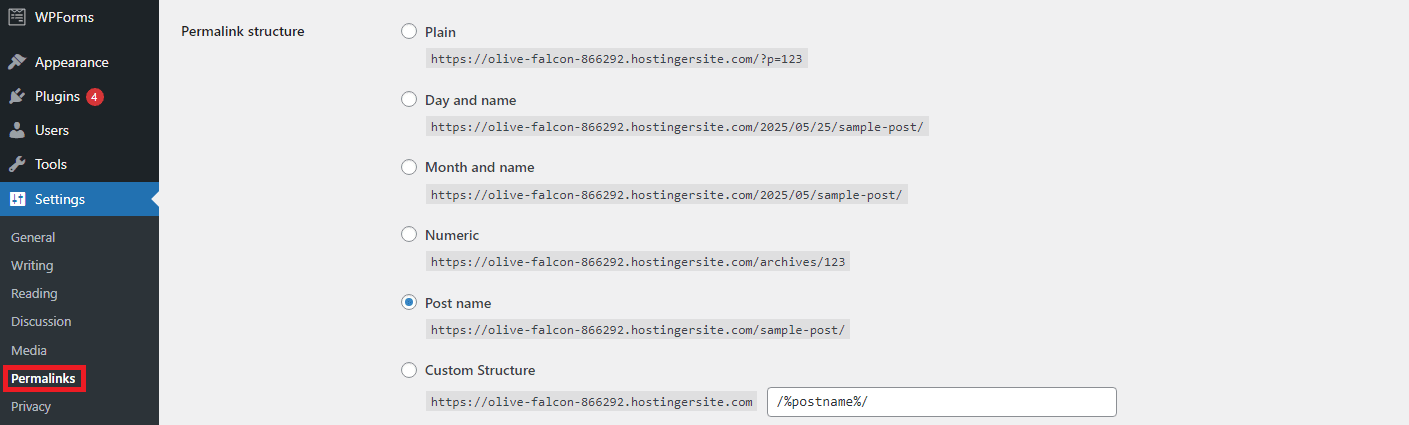
At that point, you are able to select a permalink structure.
It should be simple and short URLs such as https://example.com/sample-post/.
In case you have those sun content-rich sites and you have various categories on that site, you can add a category in the URL. And it should look more or less like this: https://example.com/category/sample-post/.
Pro Tip
Never use any punctuation other than hyphens, make URLs as short and as keyword-abundant as possible, and use small letters to avoid any conflicts or duplicates.
13. Create an Organized Site Structure
In addition to making it easier to use to end-users, a well-designed website is also easier to crawl and index by the search engines.
The taxonomy tools provided by WordPress will assist you in such an arrangement. This system organizations the posts and pages into groupings that are well-organized.
Categories and tags are the two default options for groupings. Categories deal with wide categories, and tags with small details.
There are hierarchies of categories. You can create parent-child categories to display your structure of content. Another example is that a food blog could include categories such as Recipes and subcategories such as Desserts or Quick Meals.
By putting every posting under one of the major categories, it will be clear and avoid confusion.
Tags are unstructured, and they are used to represent some details or keywords in a post. An example would be that the tags to a post in a Desserts category could also be chocolate, no-bake, or vegan.
Tags enable your user to find some related material in other categories and provide a better set of information regarding your page to the search engines.
When employed in combination, categories and tags enhance internal linking, enhance content being found, as well as facilitate the ease of browsing your site by both people and machines.
WordPress will not, by default, automatically add categories or tags to pages, but this can be added through a plugin or by editing the template code running the blog, such as introducing this code to the theme functions.php file.
In the example codes,
register_taxonomy_for_object_type() is used to indicate to WordPress that pages (‘page’) should be allowed to use categories (‘category’) and tags (‘post_tag’).
add_action( ) causes this function to be run when WordPress first loads.
To learn in more detail, refer to the Hostinger settings in the taxonomy of WordPress.
14. Customize Block Styles to Design Your Content
The block editor (Gutenberg) of WordPress enables you to organize your pages into a sequence of blocks with various content in each block.
Click on any block in the Gutenberg editor and go to the right-hand sidebar. Style options particular to that block will be available.
There is also the option to alternate block styles (such as default vs. outline) when it is available, or you can choose to use custom CSS classes in case you would like to exceed existing tools.
You can use the block style customization option when you want professionally-looking, visually coherent pages, representing your brand, perhaps without having to write any HTML and CSS code. There is also a block style switcher (much like default vs. outline) in some cases, or you can even add custom CSS classes to anything.
With the help of block customization, you can add to your page stylistically cohesive, professional-looking pages that are fully branded, without touching a single line of HTML and CSS code.
15. Create and Use Patterns
WordPress block patterns consist of several blocks and are ready-made layouts.
They are the pieces of content that can be used again and again (a feature list, a testimonial row, call-to-action banner, etc), which you can plonk into a post or a page with one click of a button.
Patterns make the creation of content faster, guarantee design uniformity across your site, and save you time by eliminating redundancy. You do not have to redo the entire layout again; just open a pre-stored pattern and adjust the contents.
Your pattern:
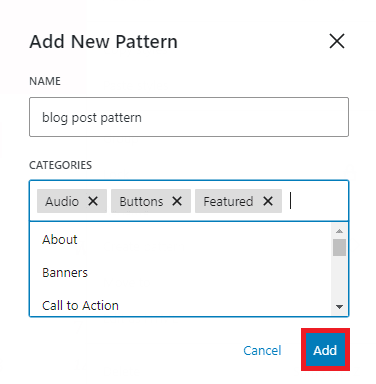
To make your pattern, select the three-dot menu and select Create pattern (or Add to Reusable blocks, depending on your version of WordPress).
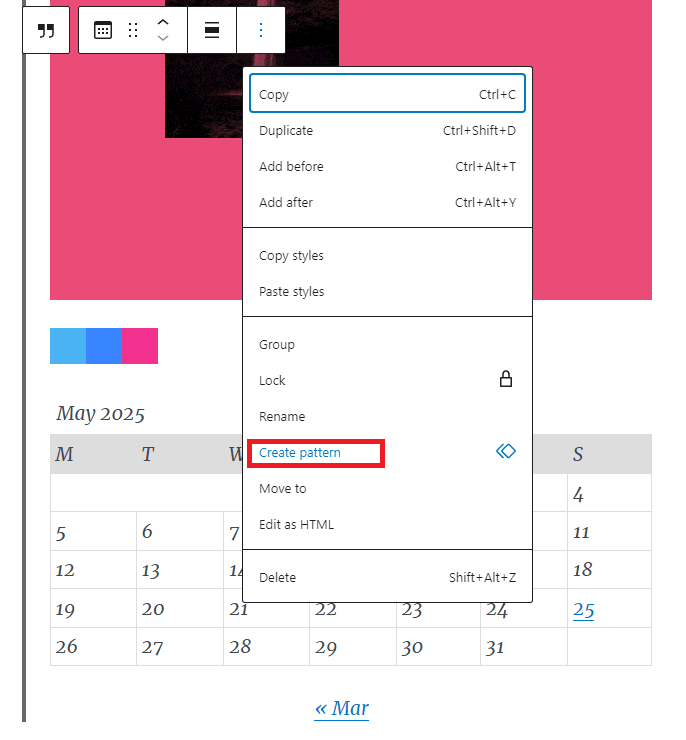
Highlight all the desired blocks and then hit the Add button.
When next working on an edit of some content, go to the Patterns tab in the block inserter, and drag and drop your pattern on top of the page.
16. Display the Last Updated Date On Posts
Another way to create trust in readers is to display the last update date on your WordPress posts of time-sensitive material, such as tutorials, reviews, and industry news.
It demonstrates that your content is up-to-date and kept constantly updated, which can positively affect your click-through rates when it comes to search results.
The problem with WordPress themes is that their default behaviour is to display the original date of publishing; however, you can also change your theme so that it displays the last updated date.
Paste the snippet of PHP code into a functions.php file of your theme, or a custom plugin:
function show_last_updated_date() {

    $updated = get_the_modified_time('U');

    $published = get_the_time('U');

    if ($updated != $published) {

        echo '<p class="last-updated">Last updated on ' . get_the_modified_time('F j, Y') . '</p>';

    }

}
Then copy this function into your post template file (single.php or content-single.php) so that it should be positioned ideally just under the post title:
Last update:
<?php show_last_updated_date(); ?>
That’s it! The new date of the latest update will be shown on your posts now.
17. Set Up Redirects for Changed URLs
By altering the URL of a page without redirect, traffic will decline and lower your position in the search engines, as well as the users ending up on a page that does not exist.
Here are the 301 redirects that come to the call. They make search engines and site visitors know that a page has permanently changed its location to a new one.
The backlinks to your old URL will not work, and they may end up on a 404 error page without them.
The simplest method of establishing a 301 redirect is a plug-and-play solution, such as Redirection or Yoast SEO Premium.
These allow you to go ahead and create the redirects right off your WordPress dashboard without having to go into the code.
When you want to add redirect rules manually, it is therefore possible to include redirect rules in the .htaccess file (Apache servers) of your site, or you can include them in your functions.php listing using PHP code.
The best way to do so is by checking our thorough instructions on how to implement 301 redirects on WordPress.
18. Use a Custom Login URL
Any WordPress site, by default, will have the same URL as the login page (/wp-login.php or /wp-admin). This is why it is an easy prey to bots and attackers that employ automated scripts to brute-force their way in.
It does not bulletproof your site, but it does include a nice level of security in that it obscures the front door.
With the help of plugins such as WPS Hide Login, you can safely change your WordPress login URL without making modifications to text files in the WordPress core.
Once you install the plugin, visit the plugin settings, and enter your custom login slug (e.g. /secure-login), then save. You will now have a new URL which you can bookmark.
Important! By default, WordPress reverts to the default login URL in the event of a failed or deactivated plugin.
19. Be Selective With Plugins
Plugins have strong potential to improve your WordPress site functionality, but excessive installation of these can bring more problems than solutions.
Each you bring onboard is a chunk of third-party code, and not all of them are written to the same level of performance or security.
The site slowdown, and create conflicts, introduce security holes, and make maintenance a nightmare, can be caused as well by poorly coded or obsolete plugins.
The question before adding a plugin:
-
- Am I really in need of it?
-
- Is it possible to use an inbuilt WordPress tool or the combination of the existing ones to reach the same outcome?
-
- Does it have a developer with a good reputation who keeps it maintained?
-
- Is the problem I am addressing a genuine one or merely a bright thing to complement?
In case you still believe that you require a new plugin, it is high time to assess it adequately, i.e.:
-
- Reading Ratings and Reviews– Search to see positive reviews and a large number of users.
-
- Testing Compatibility– And always make sure that the plugin is compatible with the version of WordPress you use.
-
- Avoiding Duplicate Plugins– There is no reason to use more than one plugin to accomplish similar things because a conflict may result, and it may create some performance problems.
Keep your plugins up to date to patch vulnerabilities and remove unnecessary ones.
20. Manage Custom Code Properly
Your WordPress site can be optimized more than what themes and plugins can provide, and custom code may enable you to do so, but it needs to be handled cautiously.
Rather than modify the core files of your theme directly (which will break your site or be replaced on the next update), make a child theme, and put your own CSS or PHP in style.css, functions.php, or any other files out of the parent theme that you wish to alter.
This will allow you to safely supersede styles, templates, and functions without altering or changing the original theme.
To allow smaller tweaks, a safer, user-friendly alternative is a code snippets plugin such as the Code Snippets or WPCode.
The tools help you add and operate custom functions via the dashboard without involving your theme files.
When you begin to add snippets then it is better to document them. Name the snippets well with explanatory comments as to what they are, and make sure you do not fill your site with excess and experimental coding.
Once you are doing larger-scale customization, possibly in a team or doing work on behalf of a client, then version control with Git may be useful.
This will allow you to follow all the changes, undo errors, and work as a team.
Conclusion
WordPress is extremely flexible, and yet it requires more than one button press when dealing with it.
The 20 tips already discussed will assist you in ensuring that your site runs optimally, that it is more secure, and that your visitors have a great time on your site.
There is a huge number of possibilities to apply them all, or just some of them, whether you are a hobbyist or a full-time site owner.
Key Takeaways:
-
- It must be fast and secure – maximize your database, do quality web hosting and set your site to be regularly backed up.
-
- Child themes, block patterns, and excerpts make customization and content design a simple task.
-
- Site development through site staging and site management tools such as WP-CLI ensure an easier development process.
-
- It does not hurt your site to have clean structure and smart use of plugins.