The most common open-source content management system (CMS) is WordPress, which is versatile and scalable. It is free, and to get ready to establish your WordPress site, one has to install it.
This WordPress tutorial will take you through an installation of WordPress on web hosting. The next two tactics that we are going to discuss are specifically oriented towards the users of the websites hosted in Hostinger.
We will go ahead to discuss some issues you may face during the WordPress installation process and the possible troubleshooting measures you can take to rectify them.
What Do You Need Before Installing WordPress
These are the WordPress requirements that you should follow to install CMS:
Web Hosting
Although WordPress is a free web application, it is self hosted and thus needs the provision of a host to contain files and information of the web site. Hosting providers such as Hostinger offer prices of different hosting plans.
To perform at its best potential you should choose a web hosting service that supports the two mentioned programming language and database management system:
- PHP 7.4+
- MySQL 5.7 or MariaDB 10.4 or newer
- HTTPS support
WordPress Websites Hosted in Hostinger: WordPress headers have more than the minimum site needs because they are set to perform the best. Priced as low at RM9.99/month, further features you can enjoy include a one-click WordPress installer, unlimited free SSL to secure your websites, advanced defense against malware and DDoS attacks, and up to 200 GB NVMe storage.
Sale is Live! Get 20% OFF on fast and reliable Cloud Hosting, Shared Hosting, VPS Hosting, WordPress Hosting, and Node.js Hosting. Click here.
Domain Name
Your domain name is the specific address of your site on the internet and it is easy to do a search and make appointments to visit your site because it is easy to locate. Purchasing a domain is made possible by using a domain registrar or you can easily procure a hosting plan that actually comes with its domain, which is free.
Hostinger delivers all the managed WordPress hosting with a free one-year domain registration. It contains WHOIS privacy protection as well, which protects your data.
Your domain name has a huge influence in your web presence and therefore, choose one that defines your brand or online face. Read our guide to find further information on how to select a domain name of your website.
WordPress Installation Files and Tools
Other requirements based on the way you want the installation done are as follows:
- A manual installation of the WordPress package downloaded from WordPress.org.
- An FTP client or a file manager to upload WordPress core files to the web server.
- A code editor in order to edit WordPress core files.
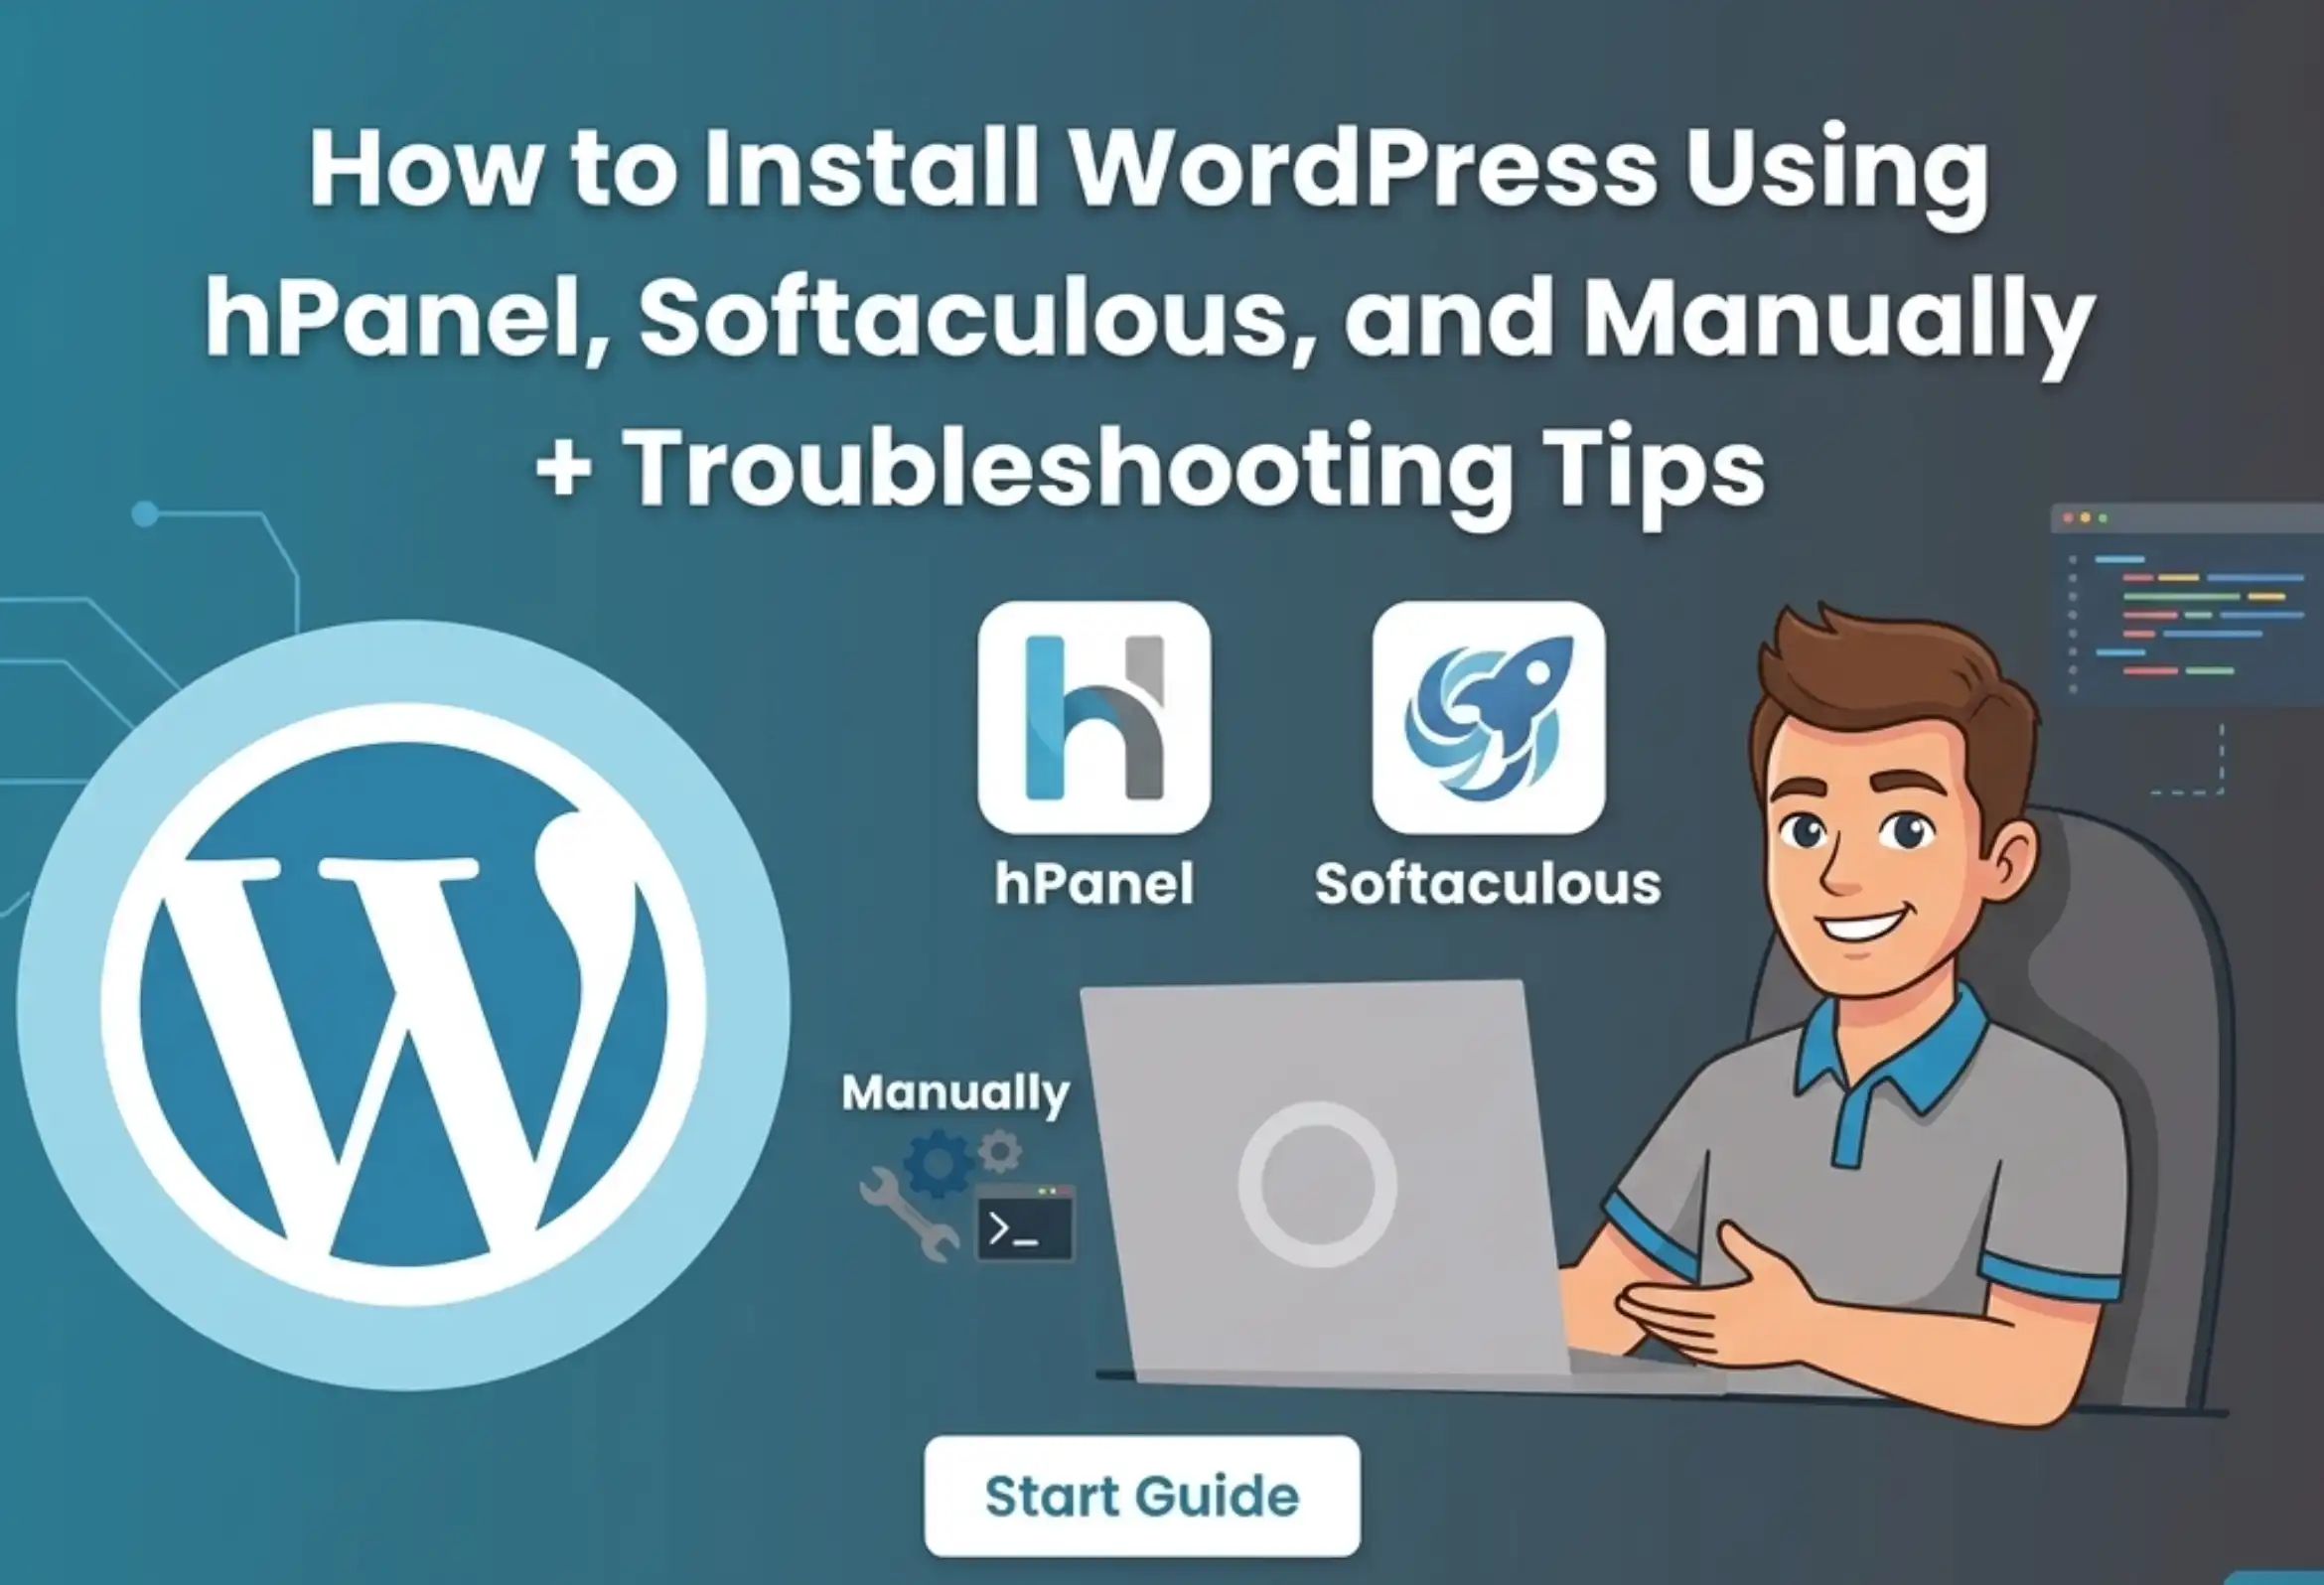
How to Install WordPress
There are two ways in which WordPress can be run with Hostinger- the onboarding flow and the auto installer. Those who are non-users of Hostinger may use Softaculous to have a seamless installation, or they may also opt to have a manual installation.
This part of the tutorial will help you go through each method. Simply use the one that suits you the most.
How to Install WordPress Using hPanel’s WordPress Onboarding
Users of Hostinger with Business and cloud levels of website hosting have the option to create their new WordPress during the onboarding process. This approach is aimed at amateurs and people who wish to open their site as soon as possible, using the built-in AI tools of rapid content creation.
This is what WordPress onboarding flow looks like in Hostinger:
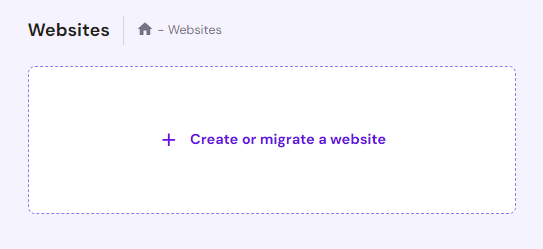
- Log in to hPanel, which is Hostinger’s control panel, and go to Websites. Click to create or import a site.
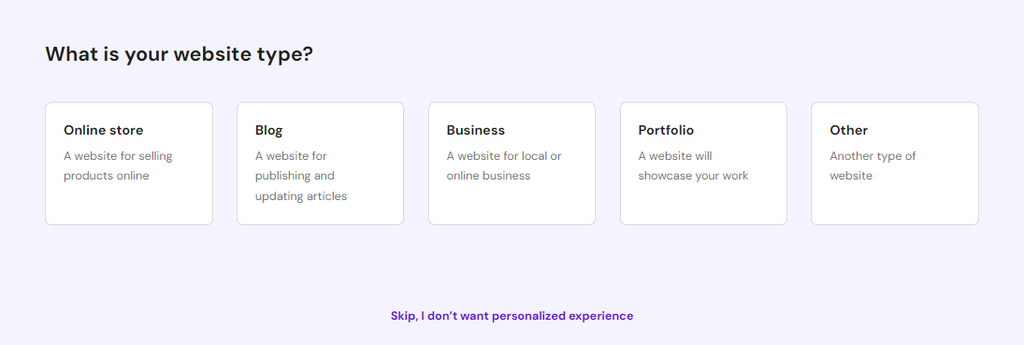
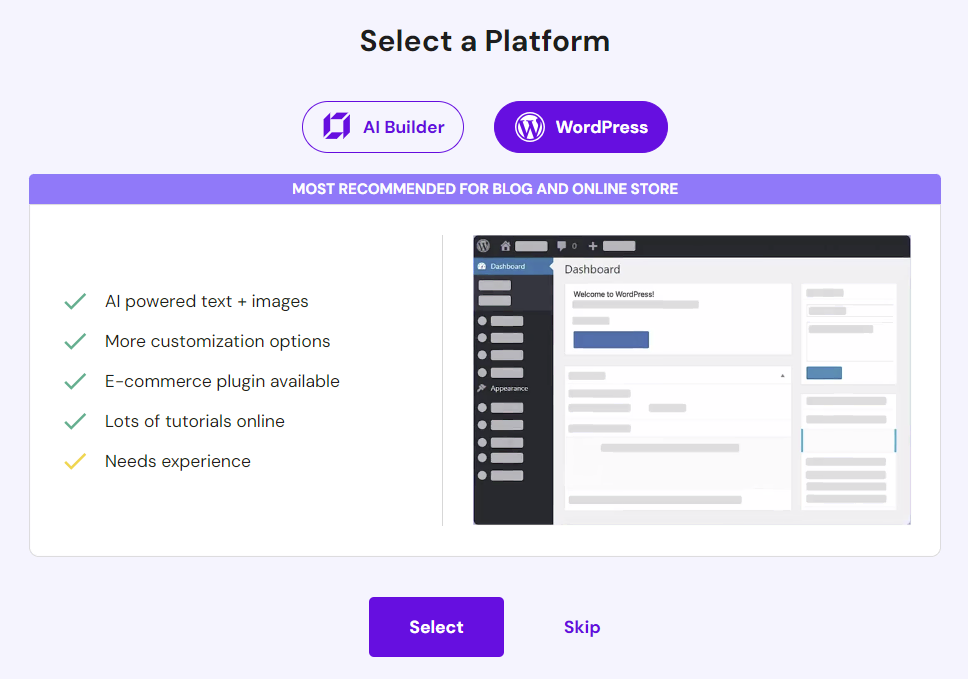
- Select the kind of site you are going to put up.
- Go to Create a new website, and click on WordPress.
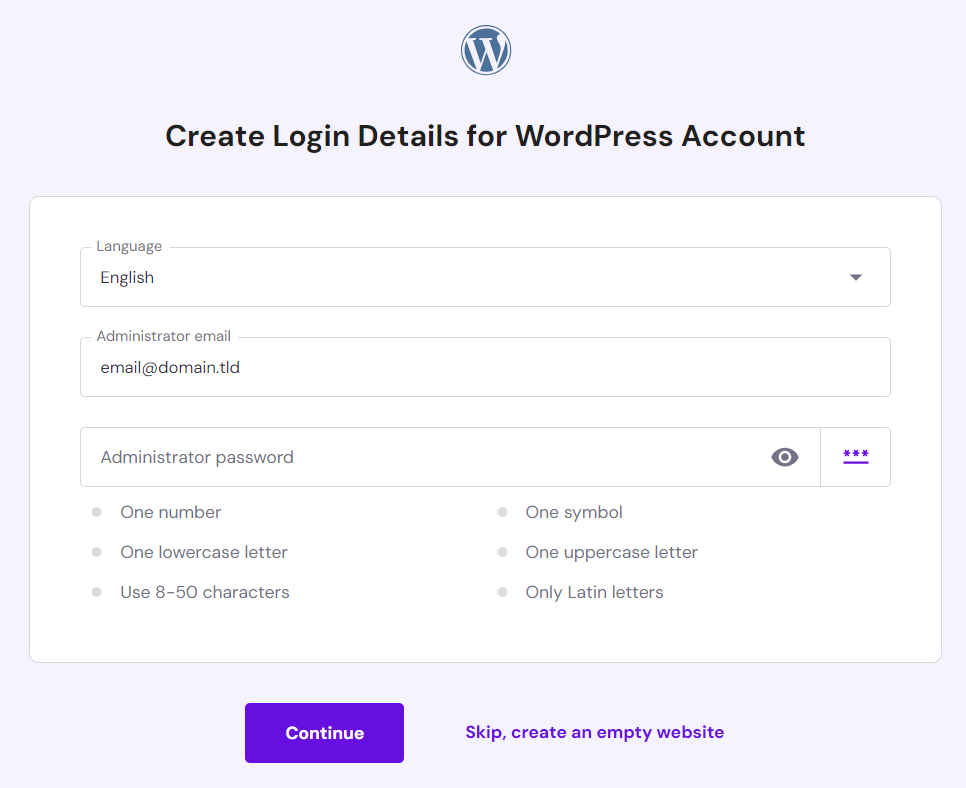
- Choose the language you would like to use and log in with the credentials to your new WordPress account. They need not match these with the web hosting login details, but they should have a strong password to avoid a security breach. When you are ready, click on Continue.
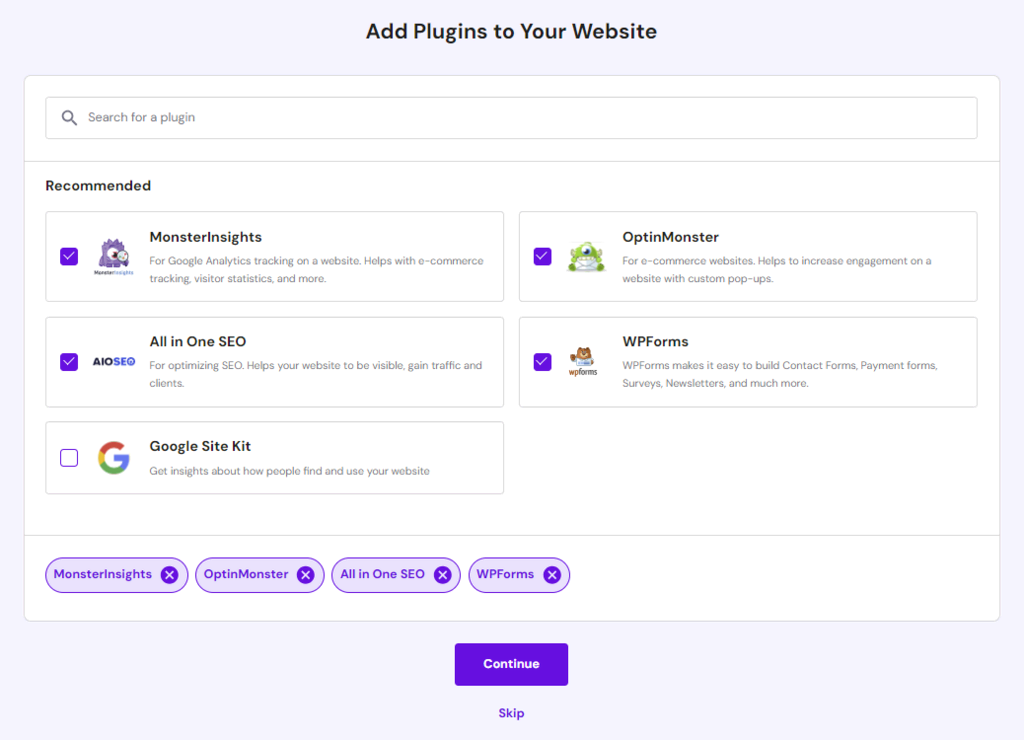
- Look up and find the WordPress plugins that you wish to be installed automatically and tick/cross out the items that you do not require. Then, click Continue.
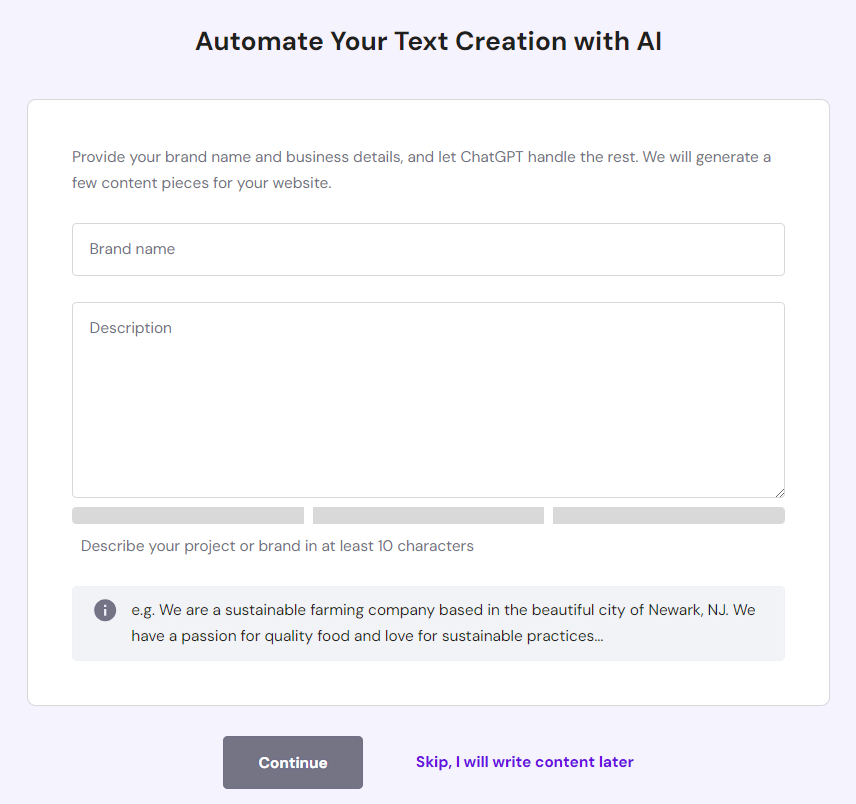
- Once you select a WordPress theme, you will get an interface to automate content writing using AI. When you enter your brand name and write what you do. This information will then be used as the guide that our WordPress AI tools will follow in filling your site with content. Click Continue.
- To initiate the installation process, one would need to register a new domain name or select an existing name by clicking on the drop-down field, which could take a couple of minutes to complete.
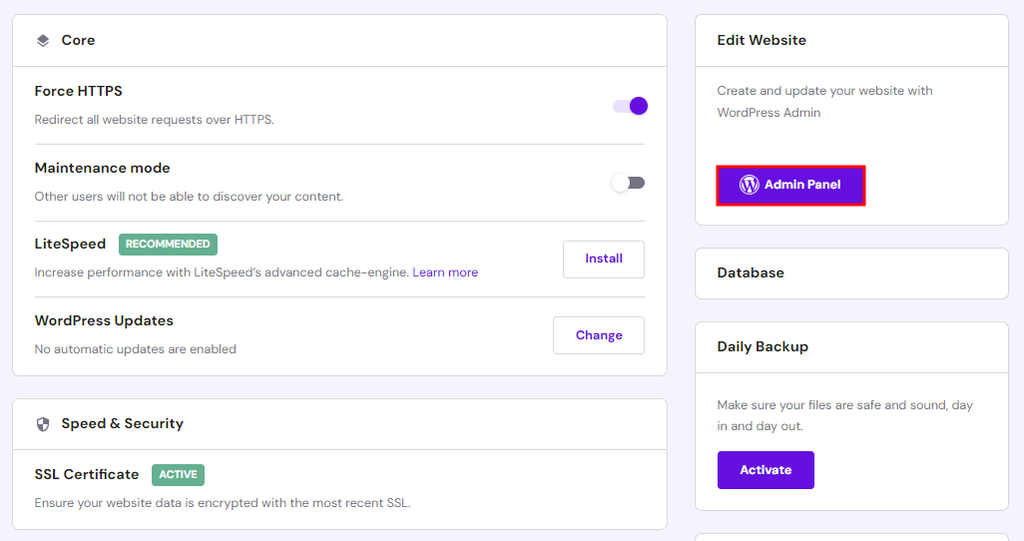
- After installing WordPress, back on Websites in hPanel, you can go to the Admin Panel and view you dashboard.
How to Install WordPress Using hPanel’s Auto Installer
This is the most effective way of installation in an old version of WordPress. It is also perfect to install WordPress on a subdomain without any interference of the parent domain, which is its extension to the main site.
This is how to set up WordPress via hPanel Auto Installer:
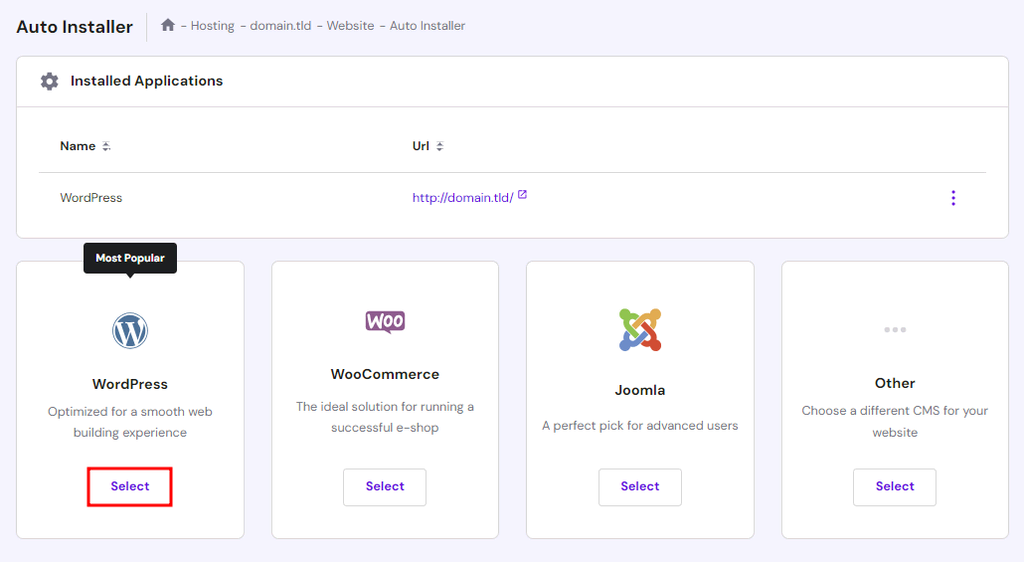
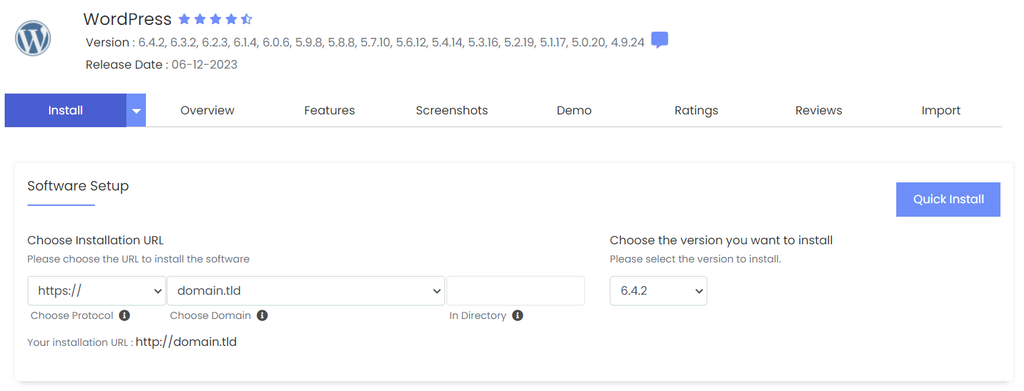
- Log in to the Website→ Auto Installer at hPanel and pick WordPress.
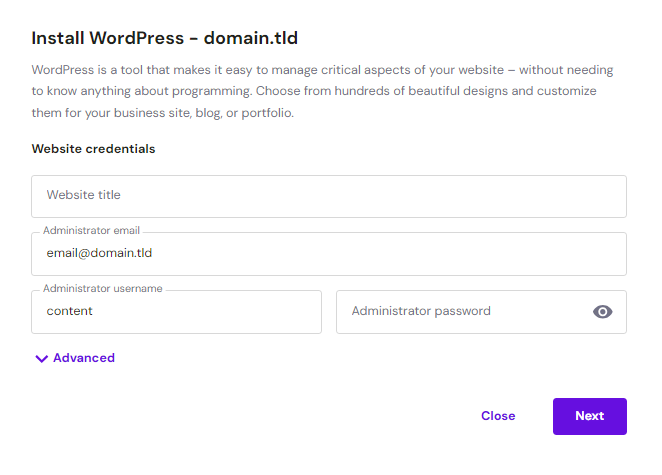
- Type in the site name, e-mail address, username, and password to log in to WordPress. Hit Next.
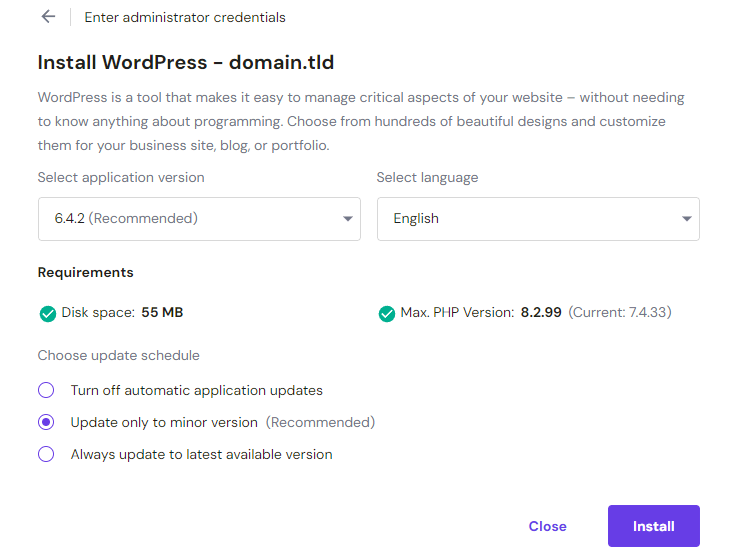
- Choose the version of the application you want, its language, and how often to update it. Those who wish to have automatic updates, we would suggest that the Update only to minor version option be selected. When that is done, click on Install.
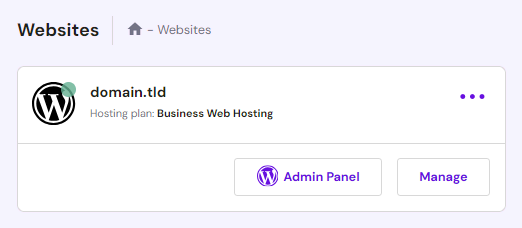
- Your WordPress instance that you installed will be under the Installed Applications section. Open the three dots beside your WordPress address and click Manage, to get to the part of hosting dashboard area.
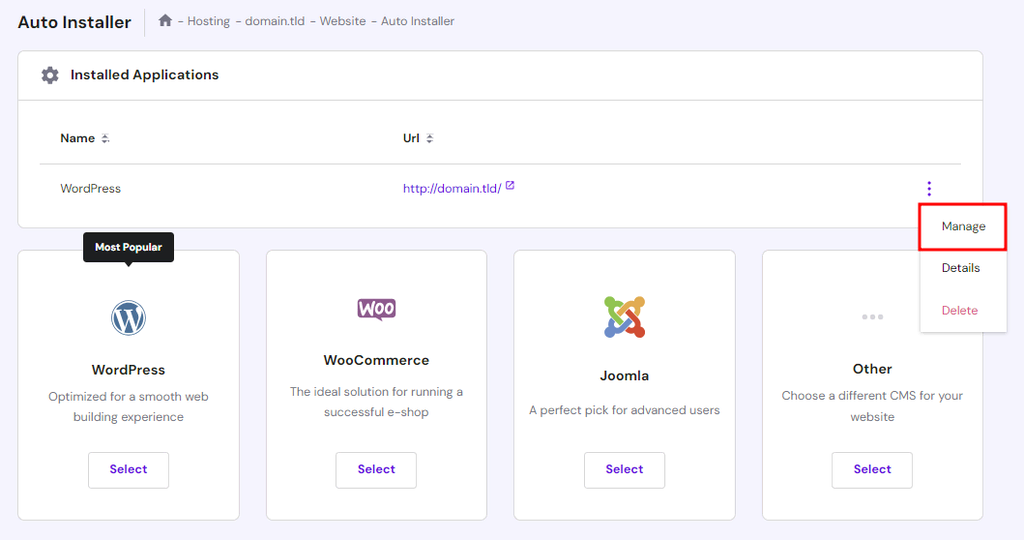
- Press the Admin Panel to access WordPress command centre.
How to Install WordPress Using Softaculous
WordPress can be installed by Softaculous by non-Hostinger users. It is a popular auto installer script library that connects with cPanel, Plesk, DirectAdmin, and InterWorx control panels.
This is how one will be able to install WordPress through the cPanel:
- Log in to the cPanel account and click on Softaculous Apps Installer and choose the Install WordPress button.
- Select the number of the encryption you prefer and the version of WordPress you wish to install. In case your hosting allows you to use an SSL certificate without a fee, choose the https:// option in order to activate the HTTPS protocol. Find out what the difference is between HTTP and HTTPS in our guide.
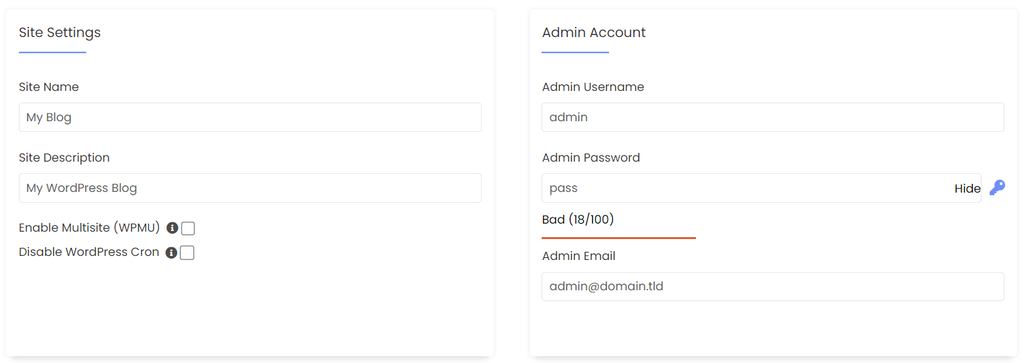
- Fill in the name of the site, description of the site, administrator username, password and email id. In case you wish to install WordPress with subsites, tick the Enable Multisite box.
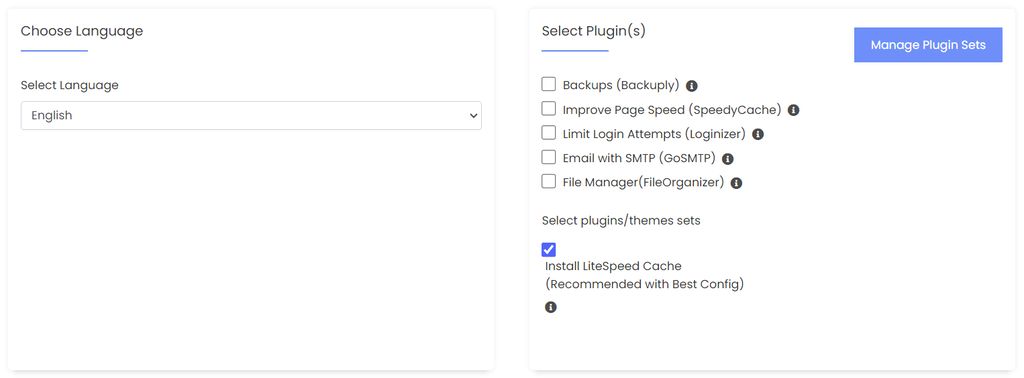
- Choose the language you want to visit in the drop-down list, and install any required plug-ins. At least in this tutorial, we are simply going to install the recommended LiteSpeed Cache plugin.
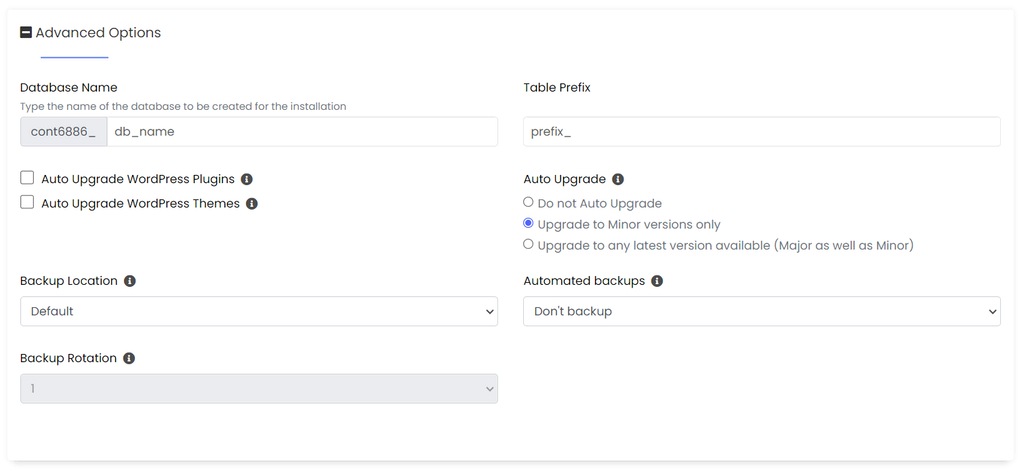
- The advanced options contain the database and backup settings. By default settings will be used at this point.
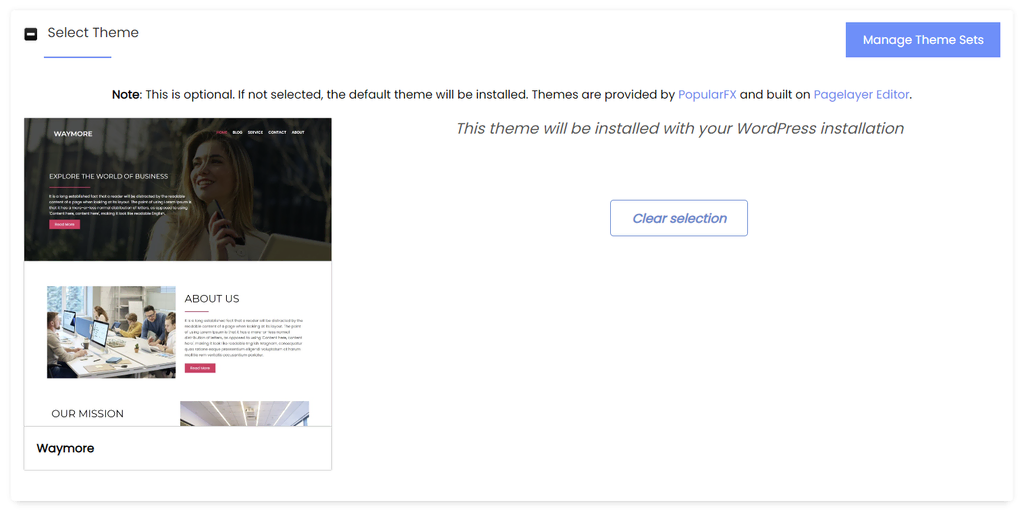
- Select a theme among the choices and click Select Theme. Choose Hit Clear selection in case you wish to switch your decision.
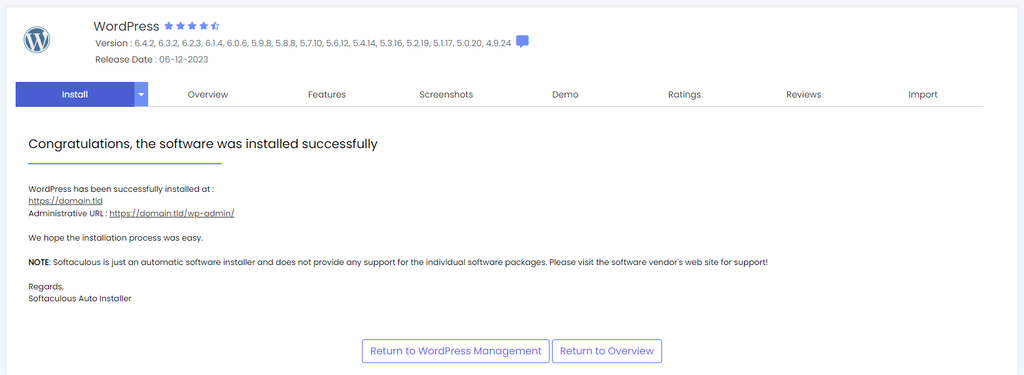
- After you are satisfied with all these settings, press the Install button at the bottom of the page. A successful setup process will be noticed by displaying the following display. To reach the admin, open the administrative link (domain.tld/wp-admin).
WordPress Manual Installation Guide
A WordPress manual installation can be used in case the above procedures did not go through or the web host may not have an auto installer.
Unlike the other two, this approach presupposes installing WordPress files into your hosting account. The procedure is not too complex to learn and even a lay person can follow it, although it will obviously take longer.
Phasing WordPress to the Web Server
This is how you can upload WordPress installation files to your hosting account by using Hostinger’s live manager:
- Get the recent version of the WordPress package on the official site.
- Go to hPanel Files -> File Manager.
- Post the ZIP file in the root directory (public_html). Right-click on the file and use Extract.

Our Bops guide on Hostinger File Manager is a good place to look at in case you are struggling with using our tool.
This is How You Transfer Files to Your Web Server Using an FTP client:
- Get a copy of WordPress package in the official site and extract it on your computer.
- In the hPanel visit Files and then FTP Accounts and add new FTP account.
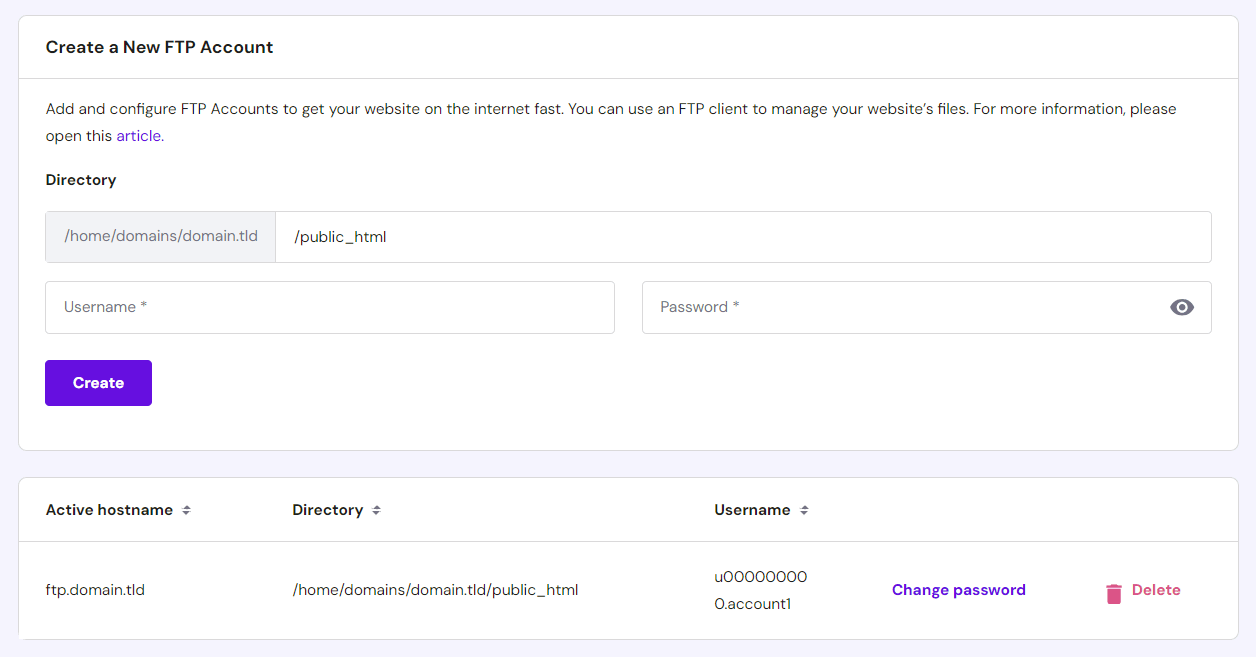
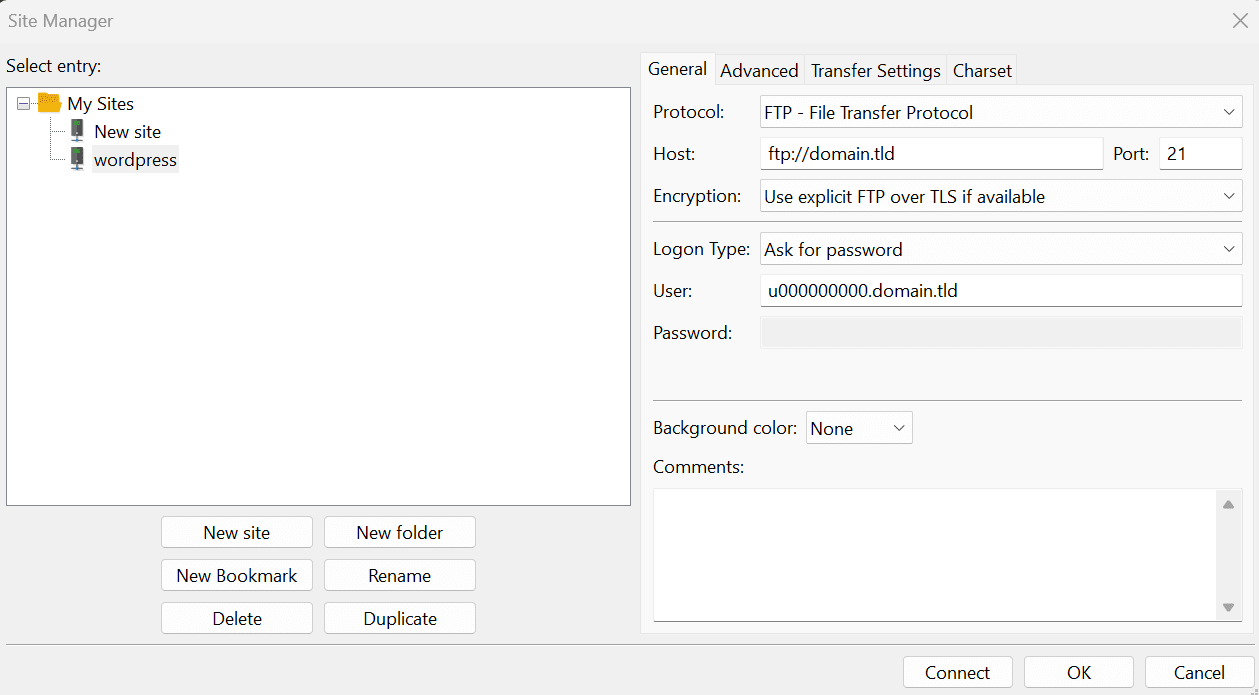
- Open a FTP client such as FileZilla and then log into the FTP server using your web hosts information. In your host account on Files > FTP Accounts, you will find the FTP specifics of Get Hostinger.
- Copy the obtained WordPress folder to the main folder (public_html).
Make a MySQL Database and User
Data in a web site are stored in a central hub known as database. It contains all the essentials of the site including the user info, site settings and such content as the posts and pages. A database user can interact with the database having access and permission. WordPress is a database management system enhanced by MySQL.
Feel free to read our article to find out more about the way the WordPress database operates and how it can be handled efficiently.
You can create a database and user with your manual WordPress installation as follows:
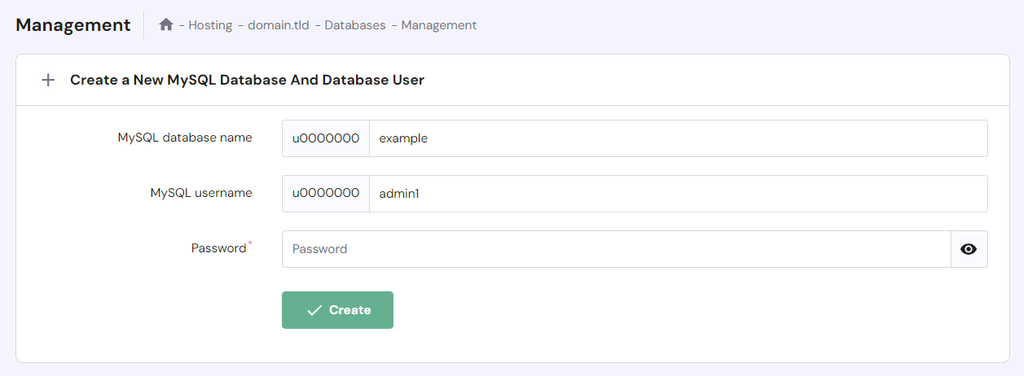
- Access Databases Management in hPanel.
- Construct the arrangements of the fresh MySQL database, user name, and password to your WordPress installation framework and press create. Record your MySQL database details so that you can use it.
Configure wp-config.php
One of the most important files which are core installation files is wp-config.php which contains the database name, the username, password, and the web server details. By entering your WordPress connection information into the wp-config file that WordPress comes with, you allow the site to connect with your MySQL database.
These are the procedures to update how wp-config file works on your new WordPress site:
1. You can access your root folder through file manager or FTP client.
2. Access the file with the installation files of WordPress. Find the sample WordPress configuration file, wp-config-sample.php, and make it a true one changing its name to wp-config.php.
3. Open the file with a right-click and this time choose Edit. After starting it open it, and you would find the following code snippet:
// ** MySQL settings - You can get this info from your web host ** //
/** The name of the database for WordPress */
define( 'DB_NAME', 'database_name_here' );
/** MySQL database username */
define( 'DB_USER', 'username_here' );
/** MySQL database password */
define( 'DB_PASSWORD', 'password_here' );
/** MySQL hostname */
define( 'DB_HOST', 'localhost' );
4. Substitute the database_name_here, username_here and password_here placeholders with your MySQL database Credentials. Do not forget to put the alphanumeric strings because they are case-sensitive.
5. After you completed the editing, you should press the Save button.
execute WordPress install Script
The installation process of WordPress can be initiated now that everything is ready. Install your WordPress environment following the following steps:
- Open a browser window and then type in domain.tld/wp-admin/install.php or domain.tld/subdirectory_name/wp-admin/install.php in case you installed WordPress in a subdirectory. This action executes a WordPress setup program.
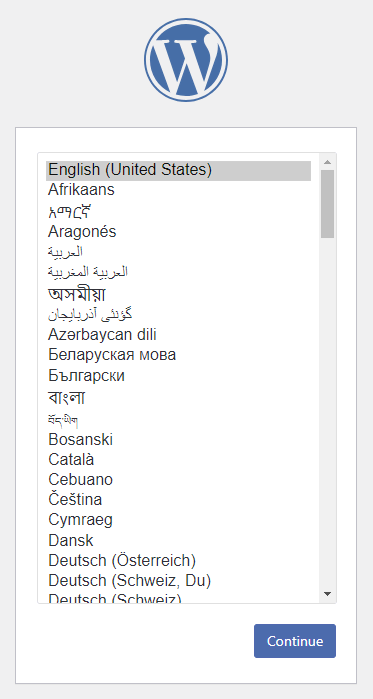
- Select a language of your new WordPress site and press Continue.
- Fill in the site title, enter username, password, and email address to log in to the WordPress administration page. In the Search engine visibility field, make sure to check the box in case you do not want to use search engines to index your WordPress site and appear on the search-results page.
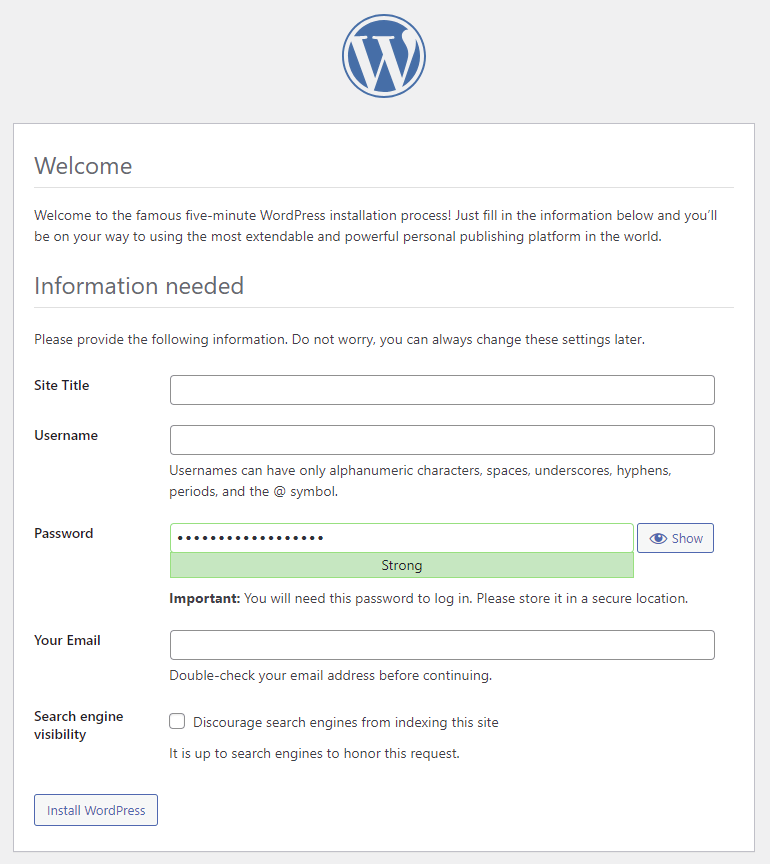
- To begin the process of setting up WordPress, left click on Install WordPress.
- After the completion of installation of WordPress a pop-up will take you to a login page. Type in your credentials and then press Log In in order to access the admin dashboard.

WordPress may also prompt to take your MySQL database information at times after choosing a language. You already possess them, so press Let s go! and comply with the following:
- Add the information of your MySQL database to the format, but leave the Database Host and the Table Prefix in the same state. Change them only in case you want several installations that share one database. Click Submit.
- WordPress will investigate whether it could connect your WordPress database. Once the verification activity gets completed, you should choose Run the installation.
Is it possible to install WordPress in a local computer?
A typical practice when testing WordPress themes, WordPress plugins, and WordPress web designs is to install WordPress locally and not affect the live web site. You can read our step-to-step guide on how to install WordPress in the Windows and macOS.
The Most Typical WordPress Installation Issues
Set up errors may be experienced when WordPress is installed and this is more so when you do it manually. In this section, some of the common problems associated with wordpress installation will be discussed and how they can be solved.
Error Connecting to Database
The error that indicates an error in database, in this case, will be a message that appears as Error Establishing a Database Connection, which will not allow the necessary information to be retrieved to display the page in your web site. It is normally triggered by an invalid database information or corrupted database.
In order to resolve the problem, check the login credentials on the wp-config.php and make sure that they correspond to your MySQL credentials.
Change your MySQL password in case you are certain of the information held in the database. Go to Databases Management on your hPanel, tap the three dots sign and Choose Change Password.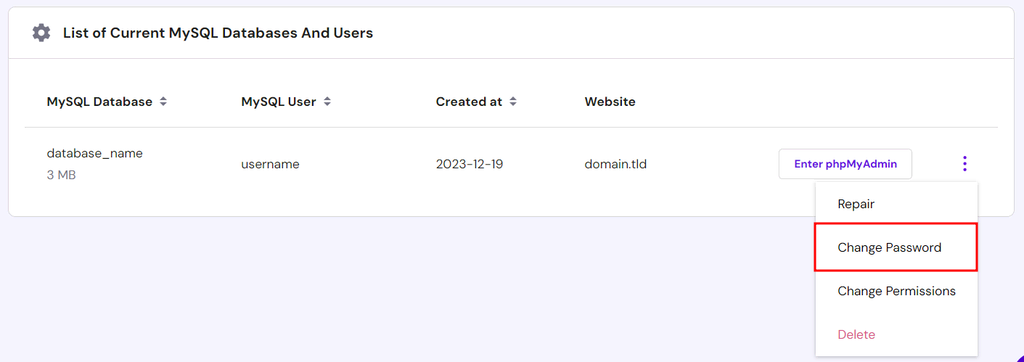
In the case of error repeat, delete MySQL database and create one more. Copy the new information about the database to the wp-config.php and attempt the installation process once again.
WP White Screen of Death
The white screen of death is a very widespread mistake in which the browser window shows nothing but the white screen with no message about the error. The most common are the limits of memory and corrupted core files, which are functions.php and wp-config.php and .htaccess.
The following are some of the possible ways of troubleshooting this WordPress error:
- In case you have changed a core file in recent times undo the changes, and reload the page. Alternatively, redownload and reruploade the WordPress into your hosting account.
- Increase WordPress memory limit so that your web site has sufficient amount of PHP memory to perform tasks and have sufficient traffic. The limit on Hostinger can be manipulated by hPanel, Advanced to PHP Configuration. Select the greatest value of the drop-down list.

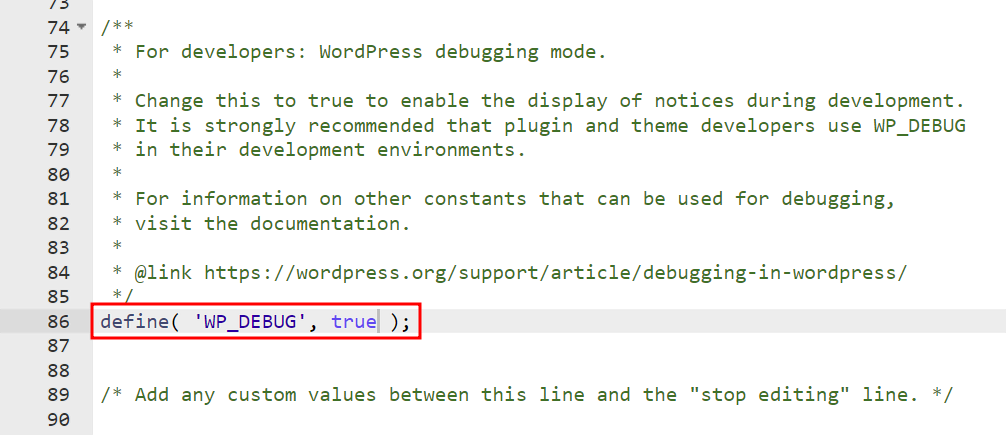
- Activate the WP_DEBUG in the wp-config.php file to debugging mode. The feature is useful in that allowing errors, warnings, and notices on your site using this feature of WordPress will allow you to determine the problem.
Modify Header Information error
This is normally caused by whitespace or characters before or after begun of PHP <?php and ended of ?> in a wp-config.php file.
The following will be done to correct this mistake, first download the wp-config.php file. Load it up in a text editor and make sure that the first line has no preceding characters or whitespace and looks like <?php and the last line has no character after it and looks like ?>. With Hostinger, a user is able to edit the file directly by using File Manager.
After you have finished, save the file and again upload it into your WordPress folder. Refresh the page to know whether the error is fixed.
Instead of a Web Page The Website Displays Directory Listing
What we are having here is that whenever your site is displaying the listing of all the files and directories instead of the web page that you were expecting to see, then it means that the web server is failing to fetch the index.php file as the default document.
The solution is to disable a directory listing. Go to Advanced Folder Index manager at hPanel and place the public_html in directory field. Change the indexing type to No index and Add.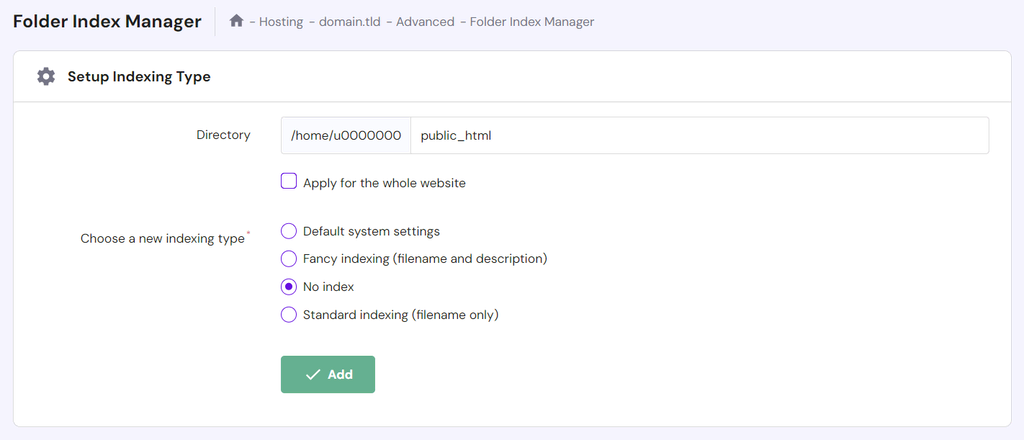
Alternatively, one will have to create a new index.php file in the public html folder via the file creation option in File Manager.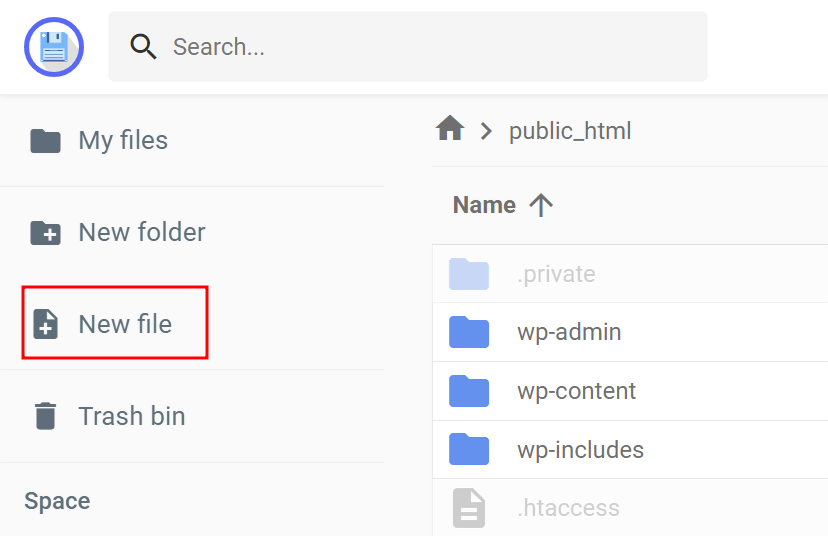
The WordPress Site Page Displays Code Instead
When your wordpress site displays raw php code instead of displaying the right content, this normally signifies that you have a problem with the php processing on your server. This error is typically brought about by wrong installation or improper configuration of PHP.
These are the troubleshooting techniques to use to correct this error:
- Ensure that your hosting company is compatible with PHP. This problem can be easily preventable by acquiring WordPress hosting at Hostinger.
- View the MySQL credentials at wp-config.php file.
- Go to Advanced and then Fix File Ownership tab in hPanel and change your files and folders to the default permissions, which is 644(file) and 755(folders). The file permissions 644 will allow to read and write and file permissions 755 will allow to read, write and execute the file or the directory.
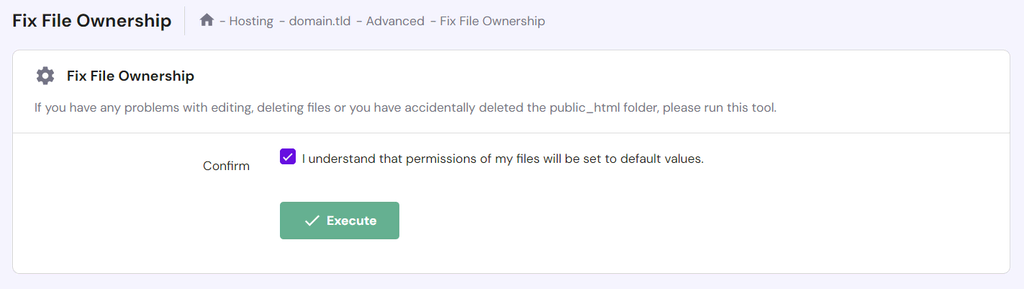
In case the mentioned procedures fail to solve the error, then our Customer Success team is available. We have a 24/7 support through live chat using hPanel.
After installing WordPress, check the best WordPress landing page plugins :10 Best WordPress Landing Page Plugins
How to Install WordPress – Video Tutorial
See our video tutorial that teaches you how to install WordPress and begin your online adventure.
Conclusion
The convenience and flexibility of using WordPress are represented through several options, such as the ways of its installation. With this strong CMS, users at all technical levels are able to take advantage of such and the set-up does not impede on them.
Again, here is the recap of the four best approaches to a WordPress installation on shared hosting environment:
- By using WordPress onboarding flow: It is the simplest among the four and provided to Hostinger users of Business and cloud hosting plans.
- With the help of an auto installer on hPanel: It is suitable, especially to those using Hostinger and would like to install WordPress on a subdomain or older version.
- Using Softaculous: The most convenient one for those who use cPanel, Plesk, DirectAdmin, and InterWorx control panels.
- Manually: Has more steps and provides complete control of the installation process, which is good when testing and establishing a local web site.
We wish that we can make your WordPress installation process easier using this article. Check our FAQ area or leave comment if you need our answer. Good luck!